前言
本文将以鼠标为例介绍小型系统上的输入系统架构以及输入信号传递的整个流程。
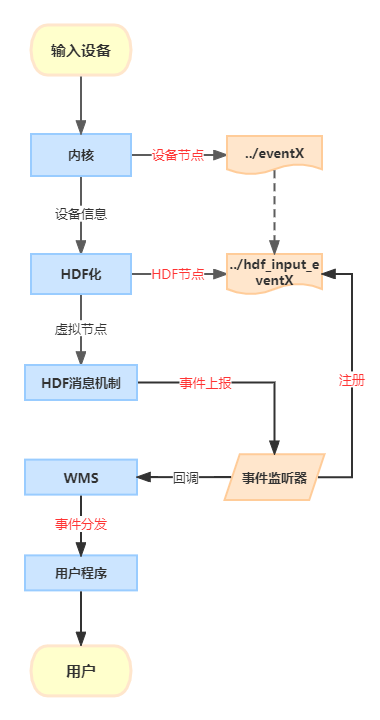
一、大致流程
- 输入设备产生信号,内核接收到并处理信号;
- 内核将处理后的信号传递给HDF化后的设备节点;
- HDF对信号进行事件上报,也就是通过HDF的消息机制与用户空间空间进行交互;
- 最后WMS给用户程序进行事件分发。
二、内核到HDF
一)、框架生成部分
由于硬件到内核这一步与linux没有太多的不同,在这里不做过多的介绍。
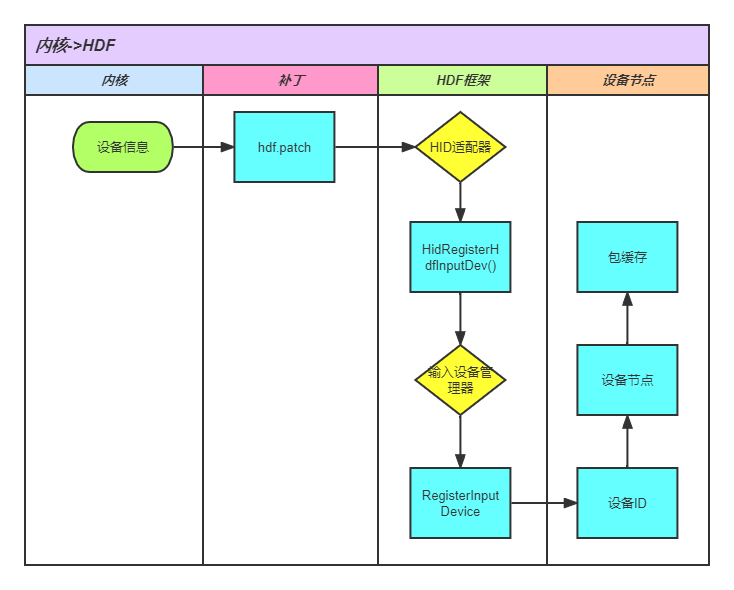
- HDF设备的注册以及后续的输入信号传递都是通过给内核添加补丁来实现的。
kernel/linux/patches/linux-4.19/common_patch/hdf.patch
+    dev->devType = type;
+    dev->devName = hdev->name;
+    hdev->input_dev = HidRegisterHdfInputDev(dev);  //Hid设备注册接口
+    if (hdev->input_dev == NULL) {
+        printk("%s: RegisterInputDevice failed\n", __func__);
+    }
+    kfree(dev);
+    dev = NULL;
+}
+#endif- HidRegisterHdfInputDev()的主要作用是调用管理器的注册接口。
drivers/hdf_core/framework/model/input/driver/hdf_hid_adapter.c
void* HidRegisterHdfInputDev(HidInfo *info)
{
    InputDevice* inputDev = HidConstructInputDev(info);
    if (inputDev == NULL) {
        HDF_LOGE("%s: hid construct input Dev failed", __func__);
        return NULL;
    }

    if (InputDriverLoaded()) {
        DoRegisterInputDev(inputDev); //将调用管理器的接口RegisterInputDevice()
    } else {
        CacheHid(inputDev);
    }
    return inputDev;
}- 管理器的RegisterInputDevice()完成分配id、缓存和生成HDF设备节点。
drivers/hdf_core/framework/model/input/driver/hdf_hid_device_managerr.c
int32_t RegisterInputDevice(InputDevice *inputDev)
{
    int32_t ret;

    HDF_LOGI("%s: enter", __func__);
    if (inputDev == NULL) {
        HDF_LOGE("%s: inputdev is null", __func__);
        return HDF_ERR_INVALID_PARAM;
    }

    if ((g_inputManager == NULL) || (g_inputManager->initialized == false)) {
        HDF_LOGE("%s: dev manager is null or initialized failed", __func__);
        return HDF_FAILURE;
    }

    OsalMutexLock(&g_inputManager->mutex);
    ret = AllocDeviceID(inputDev);  //分配设备ID
    if (ret != HDF_SUCCESS) {
        goto EXIT;
    }
    ret = CreateDeviceNode(inputDev);  //创建设备节点,也就是上面所述的hdf_input_eventX
    if (ret != HDF_SUCCESS) {
        goto EXIT1;
    }

    ret = AllocPackageBuffer(inputDev);  //分配包的缓存
    if (ret != HDF_SUCCESS) {
        goto EXIT1;
    }

    AddInputDevice(inputDev);
    OsalMutexUnlock(&g_inputManager->mutex);
    HDF_LOGI("%s: exit succ, devCount is %d", __func__, g_inputManager->devCount);
    return HDF_SUCCESS;

EXIT1:
    DeleteDeviceNode(inputDev);
EXIT:
    OsalMutexUnlock(&g_inputManager->mutex);
    return ret;
}
二)、信号传递部分
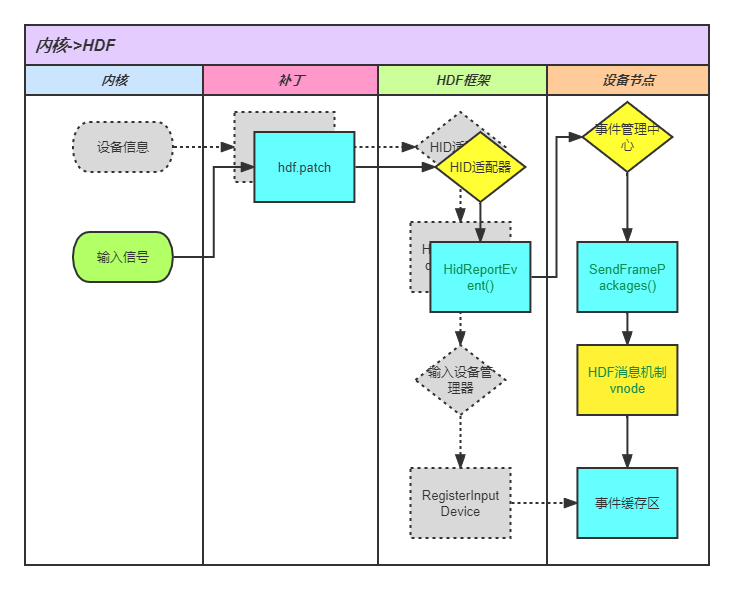
上面步骤准备就绪后,如上提及,鼠标的信息传递也是通过内核调用了HDF接口向用户空间传输鼠标的事件信号。
- 补丁调用适配器接口发送输入事件信息。
hdf.patch
+#if defined(CONFIG_DRIVERS_HDF_INPUT)
+    if (hid->input_dev) {
//内核获取到的输入设备产生的信号,将信号通过事件上报传递到HDF
+        HidReportEvent(hid->input_dev, usage->type, usage->code, value);
+    }
+#endif
hdf_hid_adapter.c
void HidReportEvent(const void *inputDev, uint32_t type, uint32_t code, int32_t value)
{
#ifdef CONFIG_DFX_ZEROHUNG
    if (type == EV_KEY && code == KEY_POWER)
        hung_wp_screen_powerkey_ncb(value);
#endif
    InputDevice *device = (InputDevice *)inputDev;
    PushOnePackage(device, type, code, value);  //调用了event_hub.c中的接口,先打包,再发送
    if (type == EV_KEY && KEY_RESERVED < code && code < KEY_MAX && value == 0 && code == g_kbdcode) {
        OsalTimerDelete(&g_timer);
        g_kbdcode = 0;
    }
    if (type == EV_KEY && KEY_RESERVED < code && code < KEY_MAX && value == 1 &&
        device->devType == INDEV_TYPE_KEYBOARD) {
        g_kbdcode = code;
        RepateEvent(device);
    }
}- 经过event_hub处理进行下一步的传递
// PushOnePackage()在这里的作用就是将事件流打成包的形式进行传递
// 代码过长不展示,PushOnePackage()处理完成包后就开始进入HDF消息机制了
static void SendFramePackages(InputDevice *inputDev) //该函数由PushOnePackage调用
{
    struct HdfDeviceObject *hdfDev = inputDev->hdfDevObj;
    if (hdfDev == NULL || inputDev->pkgBuf == NULL) {
        HDF_LOGE("%s: hdf dev is null", __func__);
        return;
    }
    //  HDF消息机制的事件上报接口
    int32_t ret = HdfDeviceSendEvent(hdfDev, 0, inputDev->pkgBuf);
}
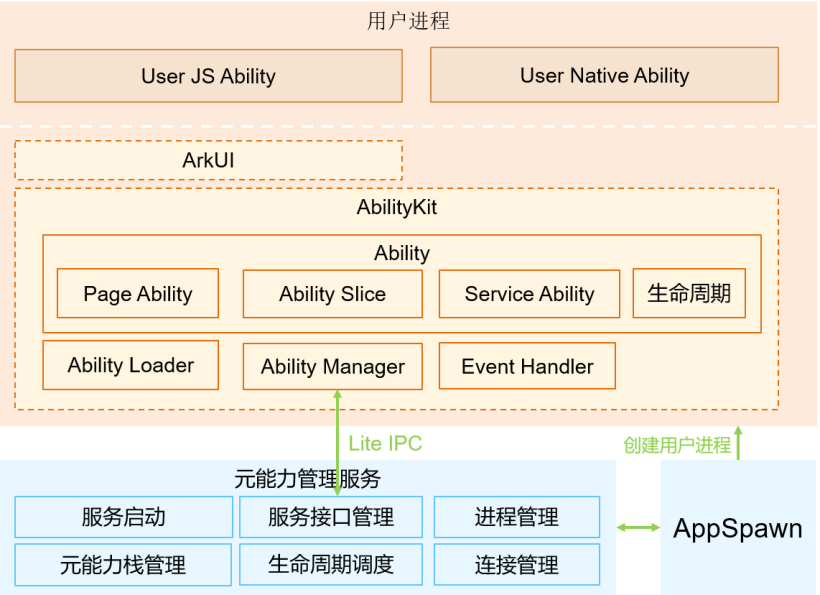
三、HDF到WMS
- WMS简单介绍
源码位置由foundation/graphic/wms变更至/foundation/window/window_manager_lite
WMS全称是Window Manager Service,顾名思义,该服务就是用来管理窗口和绘画光标等操作的。该组件里还包含了另一个必不可少的组件IMS(Input Manager Service),同理,它是用来处理输入事件的,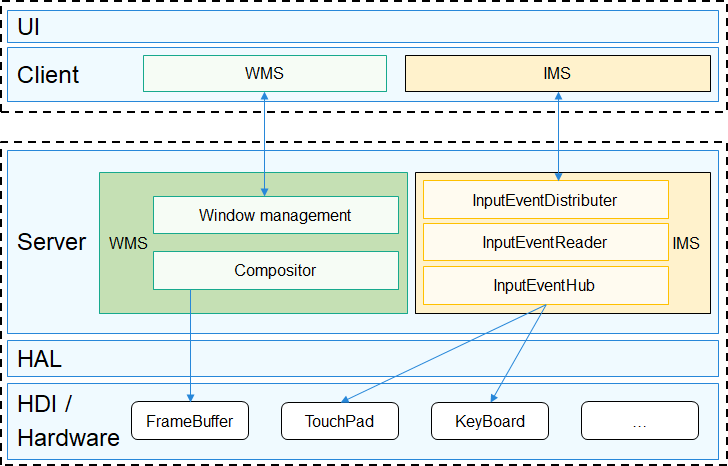
由图可知,IMS也有一个eventhub,很容易想到这边的eventhub就是用来接收内核态的evenhub发来的输入信号的。 - 消息机制简单介绍
HDF消息机制是建立用户态应用和内核态驱动的交互。主要功能有两个,一个是用户态应用发送消息到驱动,另一个是用户态应用接收驱动主动上报事件。主要接口有如下
|接口|描述|
|-|-|
|struct HdfIoService *HdfIoServiceBind(const char *serviceName);|用户态获取驱动的服务,获取该服务之后通过服务中的Dispatch方法向驱动发送消息。|
|void HdfIoServiceRecycle(struct HdfIoService *service);|释放驱动服务。|
|int HdfDeviceRegisterEventListener(struct HdfIoService *target, struct HdfDevEventlistener *listener);|用户态程序注册接收驱动上报事件的操作方法。|
|int HdfDeviceSendEvent(struct HdfDeviceObject *deviceObject, uint32_t id, struct HdfSBuf *data);|驱动主动上报事件接口。|
该消息机制的实现方法大概就是对上面相应设备的事件缓存区进行操作,具体可以查阅代码。
- 信号传递过程
如上表所示,内核态的eventhub最终调用了事件上报接口,但是事件监听器不是在IMS中的eventhub注册的。而是由硬件抽象层drivers/peripheral/input/hal中注册的。并且封装成了API供IMS使用。有input_controller,input_manager和input_reporter,分别管理输入设备的的上电、开关以及事件接收。input_reporter.h里的主要接口如下
|接口|描述|
|-|-|
|int32_t (*RegisterReportCallback)(uint32_t devIndex, InputEventCb *callback);|注册事件上报的回调函数|
|int32_t (UnregisterReportCallback)(uint32_t devIndex);|注销| |int32_t (RegisterHotPlugCallback)(InputHostCb callback);|注册热插拔事件上报的回调函数| |int32_t (UnregisterHotPlugCallback)(void);|注销|
- IMS注册事件上报的回调函数。(源码此处有问题,仅做部分展示)
// input_event_hub.cpp
ret = inputInterface_->iInputManager->OpenInputDevice(mountDevIndex_[i]);  //首先要打开设备
if (ret == INPUT_SUCCESS && inputInterface_->iInputReporter != nullptr) {
    callback_.EventPkgCallback = EventCallback;  //进行callback绑定
    ret = inputInterface_->iInputReporter->RegisterReportCallback(mountDevIndex_[i], &callback_);  //以设备号注册回调函数,此处设备号对应hdf_input_eventX中的X
    if (ret != INPUT_SUCCESS) {
        GRAPHIC_LOGE("device dose not exist, can't register callback to it!");
        return;
    }
    openDev_ = openDev_ | (1 << i);
}
注册完毕后,当鼠标触发了输入信号,将在回调函数中接收到事件。
至此,输入信号从内核传递到了用户空间。
四、WMS到用户程序
用户程序与WNS硬件之间的交互体现在UI与WMS之间或者UI直接与HAL层的交互。
在这里源码不做过多分析,留一张流程图。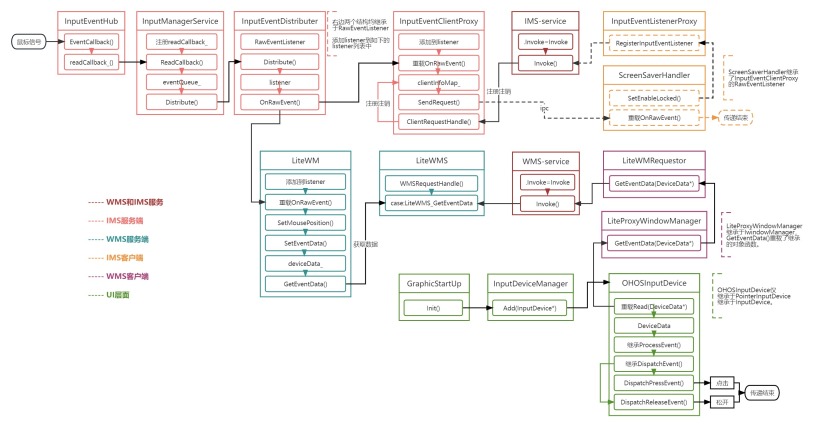
高清pdf放在附件里
总结
开源鸿蒙小型系统的输入功能仍未完善,比如热插拔问题和屏幕HDF化的设计没有考虑到无触控屏的开发板等的问题。于是在这里,我将我学到的知识分享给大家与大家共同讨论。